

games101 作业笔记(作业0~2)
作业 0
安装环境
我这边是没使用虚拟机,用的 Windows 的 WSL2, 所以需要自己安装 Eigen, 安装前还需要安装 cmake, 我这边选择的是源码安装,因为似乎包管理器安装的版本相对老一些,不过其实也问题不大
sudo apt install cmake //直接安装,版本相对老一些,但也可用
// 强迫症就是喜欢最新版的话
// 先到官网(https://cmake.org/download/)下载源码
//解压
tar -xzvf cmake-3.24.0-rc2.tar.gz
//进入目录
cd cmake-3.24.0-rc2
// 进行检查
./bootstrap
// 如果有报错根据提示自行安装缺少的包, 如 OpenSSL
sudo apt install libssl-dev
//安装缺少的包后,最好再检查确认一遍
// 最后编译和安装,这里编译可能比较慢,建议多线程 比如 make -j8
make
sudo make install
然后是安装 Eigen 库,方法类似,去官网下载源码,然后编译并安装,只不过是用 cmake 来编译罢了
tar -xzvf eigen-3.4.0.tar.gz
cd eigen-3.4.0
mkdir build
cd build
cmake ../
sudo make install
至此就安装完了
作业描述
给定一个点 P=(2,1), 将该点绕原点先逆时针旋转 45◦,再平移 (1,2), 计算出变换后点的坐标(要求用齐次坐标进行计算)。
思路
第一次作业挺基础的,熟悉 Eigen 中向量和矩阵的一些简单用法后就可以做了,因此要求齐次坐标,因此通过一个3维的变换矩阵乘上一个3维向量就可以得到答案了,因为题目里是先旋转再平移,所以可以直接写在一个矩阵里。旋转平移的通用变换矩阵为
代码
#include<cmath>
#include<eigen3/Eigen/Core>
#include<eigen3/Eigen/Dense> // 暂时似乎没用的
#include<iostream>

int main() {
    Eigen::Vector3f P(2, 1, 1);
    Eigen::Matrix3f T;
    float theta = M_PI / 4;
    T << cos(theta), -sin(theta), 1,
         sin(theta), cos(theta), 2,
         0, 0, 1;
    std::cout << T * P << std::endl;
}
1.70711
4.12132
      1
最后 cmake 编译的话参考作业文档即可,不多赘述
作业 1
安装环境
作业 1 在作业 0 的基础上需要安装 opencv,我这边直接选择安装了次新版的 opencv4.5.5
// 安装所需依赖
sudo apt install build-essential libgtk2.0-dev libgtk-3-dev libavcodec-dev libavformat-dev libjpeg-dev libswscale-dev libtiff5-dev
// 自行下载源码,并解压
 unzip 4.5.5.zip
 //进入目录,创建 build 文件夹,进入该目录
cd opencv-4.5.5
mkdir build
cd build
//配置 cmake,这里参数较多,最主要的是 OPENCV_GENERATE_PKGCONFIG 必须有
cmake -D WITH_TBB=ON -D WITH_EIGEN=ON -D OPENCV_GENERATE_PKGCONFIG=ON  -D BUILD_DOCS=ON -D BUILD_TESTS=OFF -D BUILD_PERF_TESTS=OFF -D BUILD_EXAMPLES=OFF  -D WITH_OPENCL=OFF -D WITH_CUDA=OFF -D BUILD_opencv_gpu=OFF -D BUILD_opencv_gpuarithm=OFF -D BUILD_opencv_gpubgsegm=O -D CMAKE_BUILD_TYPE=RELEASE -D CMAKE_INSTALL_PREFIX=/usr/local ..
//编译并安装,先多线程编译再安装应该会快一点
sudo make -j8 // 线程数量根据电脑配置自行选择
sudo make install
opencv 还需要配置一些环境才能使用
sudo gedit /etc/ld.so.conf.d/opencv.conf
//在文件中加入下面的路径,并保存关闭
/usr/local/lib
//执行一下命令
sudo ldconfig
我这边因为是 WSL2 里面安装的,所以会报下面的错,如果没报错请忽略这一步
/sbin/ldconfig.real: /usr/lib/wsl/lib/libcuda.so.1 is not a symbolic link
可以尝试以下方法解决
// 在 windows 里以管理员方式运行 cmd,输入以下命令
cd \Windows\System32\lxss\lib
del libcuda.so
del libcuda.so.1
mklink libcuda.so libcuda.so.1.1
mklink libcuda.so.1 libcuda.so.1.1
// 配置系统 bash
sudo gedit /etc/bash.bashrc
// 在最后面加入下面两行,并保存
PKG_CONFIG_PATH=$PKG_CONFIG_PATH:/usr/local/lib/pkgconfig
export PKG_CONFIG_PATH
最后更新
source /etc/bash.bashrc
// 下面这步个别教程里有,不过不做这步似乎也没问题,没问题的话,可以不做
sudo updatedb
// 如果出现 sudo: updatedb: command not found,则安装下面这个包再重试
sudo apt install mlocate
思路+代码
首先是模型变换,因为是绕固定的 z 轴,所以只需要简单的用绕 z 轴旋转的矩阵即可
Eigen::Matrix4f get_model_matrix(float rotation_angle)
{
    Eigen::Matrix4f model = Eigen::Matrix4f::Identity();

    // TODO: Implement this function
    // Create the model matrix for rotating the triangle around the Z axis.
    // Then return it.

    // 转换成弧度制
    rotation_angle = rotation_angle * MY_PI / 180;
    Vector3f axis = Vector3f(1, 1, 1);
    // 旋转矩阵
    Eigen::Matrix4f translate;
    translate << cos(rotation_angle), -sin(rotation_angle), 0, 0,
                 sin(rotation_angle),  cos(rotation_angle), 0, 0,
                                   0,                    0, 1, 0,
                                   0,                    0, 0, 1;

    model = translate * model;

    return model;
}
如果是提高,绕任意轴的话就是需要使用罗德里格斯公式
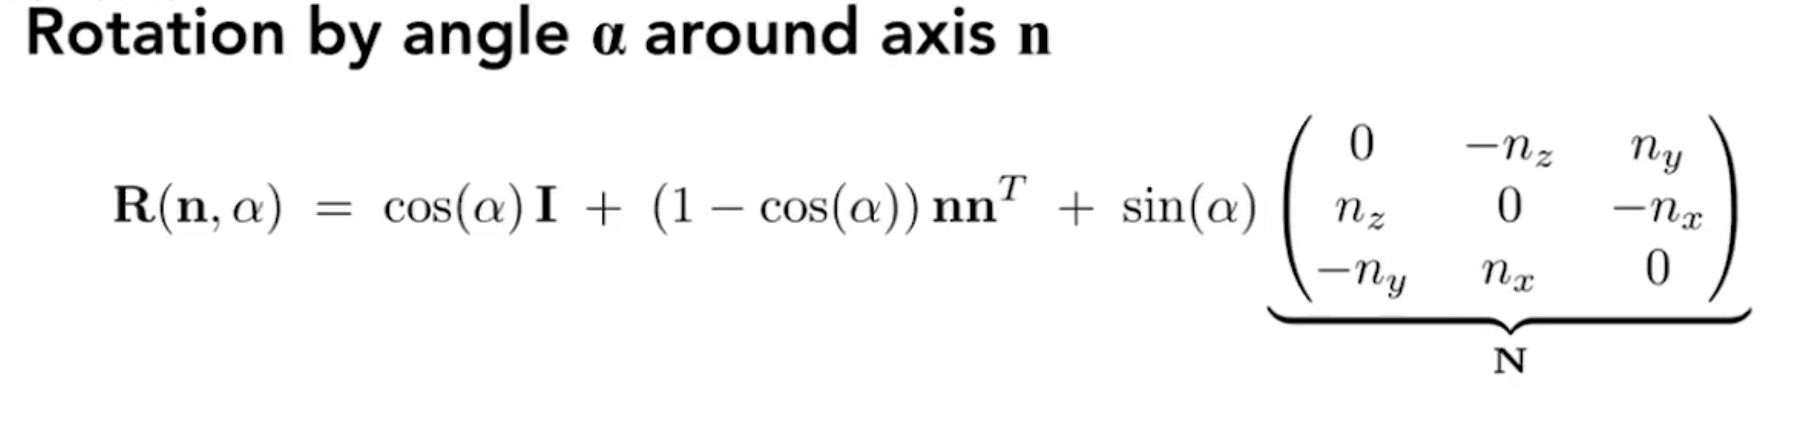
Eigen::Matrix4f get_rotation(Vector3f axis, float angle)
{
    Eigen::Matrix3f rotate = Eigen::Matrix3f::Identity();
    // 因为轴只需要一个方向, 不需要长度,所以我们将其归一化为单位向量
    axis.normalize();
    // float angle = angle * MY_PI / 180;
    Eigen::Matrix3f N;
    N <<       0, -axis[2],  axis[1],
         axis[2],        0, -axis[0],
        -axis[1],  axis[0],        0;

    // 罗德里格斯公式
    rotate = cos(angle) * rotate + (1 - cos(angle)) * axis * axis.transpose() + sin(angle) * N;

    // 扩展到 4*4 矩阵
    Eigen::Matrix4f rotate4 = Eigen::Matrix4f::Zero();
    rotate4.block<3, 3>(0, 0) = rotate;
    rotate4.row(3) = Eigen::Vector4f(0, 0, 0, 1);
    return rotate4;
}

Eigen::Matrix4f get_model_matrix(float rotation_angle)
{
    Eigen::Matrix4f model = Eigen::Matrix4f::Identity();

    // TODO: Implement this function
    // Create the model matrix for rotating the triangle around the Z axis.
    // Then return it.

    // 转换成弧度制
    rotation_angle = rotation_angle * MY_PI / 180;

    // 旋转轴
    Vector3f axis = Vector3f(1, 1, 1);
    // 旋转矩阵
    Eigen::Matrix4f translate = get_rotation(axis, rotation_angle);
    // translate << cos(rotation_angle), -sin(rotation_angle), 0, 0,
    //              sin(rotation_angle),  cos(rotation_angle), 0, 0,
    //                                0,                    0, 1, 0,
    //                                0,                    0, 0, 1;

    model = translate * model;

    return model;
}
透视变换则是分成两步,先是压缩成一个长方体,然后进行正交变换
正交变换也是两步,先是将长方体移动到原点,然后再缩放成立方体
值得注意的一点是这里的 zNear 和 zFar 其实给的是正的,但上课时是负的
这样的结果就是完全一样的照抄课上的会出现三角形倒着的情况
不过我发现只要不使用 abs 之类的方法强行变成正的,在用绝对值的地方,依旧当 zNear 和 zFar 是负的,然后直接取反,这个时候得到的三角形就依然是正的了,而且即便是负的,这样写也不受影响
Eigen::Matrix4f get_projection_matrix(float eye_fov, float aspect_ratio,
                                      float zNear, float zFar)
{
    // Students will implement this function

    Eigen::Matrix4f projection = Eigen::Matrix4f::Identity();

    // TODO: Implement this function
    // Create the projection matrix for the given parameters.
    // Then return it.

    // 透视压缩矩阵
    Eigen::Matrix4f persp2ortho;
    persp2ortho << zNear,     0,            0,             0,
                       0, zNear,            0,             0,
                       0,     0, zNear + zFar, -zNear * zFar,
                       0,     0,            1,             0;

    // 平移到原点的矩阵
    Eigen::Matrix4f translate;
    translate << 1, 0, 0,                 0,
                 0, 1, 0,                 0,
                 0, 0, 1, -(zNear + zFar)/2,
                 0, 0, 0,                 1;

    // 最后缩放到立方体
    float fovY = eye_fov * MY_PI / 180;
    float t = -zNear * tan(fovY / 2);// 这里用 abs 三角形就会倒着
    float r = t * aspect_ratio;
    Eigen::Matrix4f scale;
    scale << 1/r,   0,                 0, 0,
               0, 1/t,                 0, 0,
               0,   0, -2/(zFar - zNear), 0,
               0,   0,                 0, 1;

    projection = scale * translate * persp2ortho * projection;

    return projection;
}
作业二
思路
这次作业相对上一次简单一点,判断点是否在三角形内,只需要按课上的方法进行叉乘即可,因为这里我们不需要 z ,所以为了方便起见最好把 z 都设置成 0 ,这样就都是在平面上了,判断叉乘结果的 z 的正负即可判断是在左侧还是右侧,然后都在左侧或都在右侧就是在三角形内
另外需要注意的一点是,这里的 x 和 y 最好都改成 float 类型,这里可能看不出区别,但如果后面使用 MSAA 的话,就必须改成 float,不然就会失去效果
static bool insideTriangle(float x, float y, const Vector3f* _v)
{
    // TODO : Implement this function to check if the point (x, y) is inside the triangle represented by _v[0], _v[1], _v[2]
    Eigen::Vector3f AB(_v[0].x()-_v[1].x(), _v[0].y()-_v[1].y(), 0);
    Eigen::Vector3f AP(_v[0].x()-x, _v[0].y()-y, 0);
    Eigen::Vector3f BC(_v[1].x()-_v[2].x(), _v[1].y()-_v[2].y(), 0);
    Eigen::Vector3f BP(_v[1].x()-x, _v[1].y()-y, 0);
    Eigen::Vector3f CA(_v[2].x()-_v[0].x(), _v[2].y()-_v[0].y(), 0);
    Eigen::Vector3f CP(_v[2].x()-x, _v[2].y()-y, 0);
    float z1 = AB.cross(AP).z();
    float z2 = BC.cross(BP).z();
    float z3 = CA.cross(CP).z();

    return z1*z2 > 0 && z2*z3 > 0;

}
光栅化这边也只需要按照提示写即可,不过有几个需要注意的点
一个是 bounding box 的点是整数,而我们的三角形坐标其实是浮点数,因此要注意一个四舍五入的问题,下边界应该向下取整(因为都大于 0,float 转 int 截断就相当于是向下取整了),上边界需要向上取整
另一点就是我们应该判断的是像素的中心位置是否在三角形内,也就是横纵坐标便宜半个像素也就是 0.5 的位置
//Screen space rasterization
void rst::rasterizer::rasterize_triangle(const Triangle& t) {
    auto v = t.toVector4();

    // TODO : Find out the bounding box of current triangle.
    // iterate through the pixel and find if the current pixel is inside the triangle
    int x_min = std::min(std::min(v[0].x(), v[1].x()), v[2].x());
    int x_max = ceil(std::max(std::max(v[0].x(), v[1].x()), v[2].x()));
    int y_min = std::min(std::min(v[0].y(), v[1].y()), v[2].y());
    int y_max = ceil(std::max(std::max(v[0].y(), v[1].y()), v[2].y()));

    for(int x=x_min; x<x_max; x++)
        for(int y=y_min; y<y_max; y++)
        {
            if(insideTriangle(x + 0.5, y + 0.5, t.v))
            {
                // If so, use the following code to get the interpolated z value.
                auto[alpha, beta, gamma] = computeBarycentric2D(x, y, t.v);
                float w_reciprocal = 1.0/(alpha / v[0].w() + beta / v[1].w() + gamma / v[2].w());
                float z_interpolated = alpha * v[0].z() / v[0].w() + beta * v[1].z() / v[1].w() + gamma * v[2].z() / v[2].w();
                z_interpolated *= w_reciprocal;

                if(z_interpolated < depth_buf[get_index(x, y)])
                {
                    // TODO : set the current pixel (use the set_pixel function) to the color of the triangle (use getColor function) if it should be painted.
                    depth_buf[get_index(x, y)] = z_interpolated;
                    set_pixel(Eigen::Vector3f(x, y, z_interpolated), t.getColor());
                }
            }
        }
}
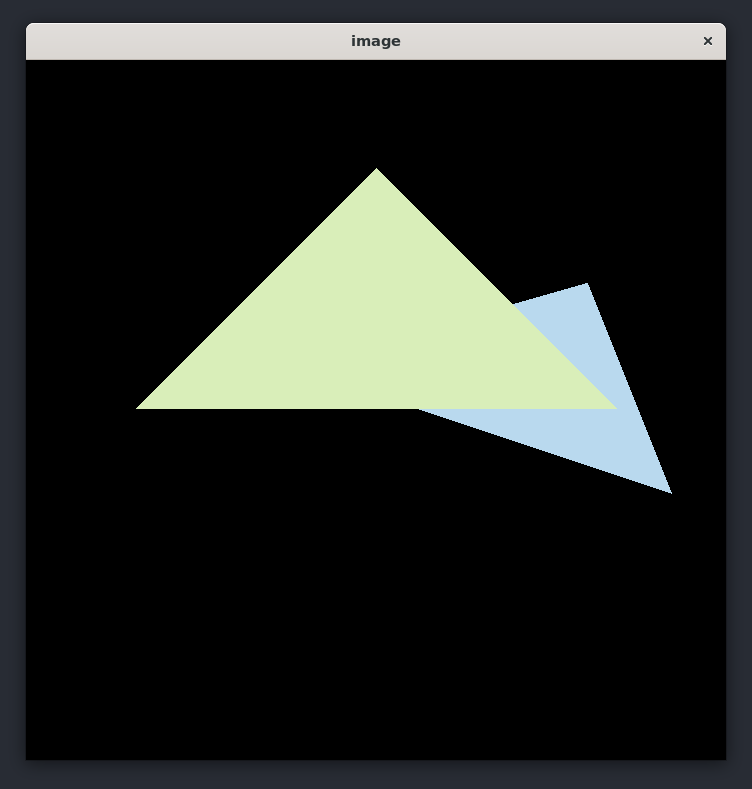
可以看到锯齿还是比较明显的
提高
MSAA 的关键就是在于把原来的一个像素拆开成多个像素,这里我们简单点还是 4X,首先我们需要 4 倍的depth_buff,另外我们需要一个 4 倍大小的 frame_buf,来暂存超采样的颜色信息,每个子像素的颜色应该单独维护,否则就会因为无法处理边缘重叠部分而导致黑边的出现
// rasterizer.hpp
std::vector<Eigen::Vector3f> frame_buf;
std::vector<Eigen::Vector3f> frame_sample;// 增加一个 frame_sample

std::vector<float> depth_buf;
int get_index(int x, int y);
// 使用 4 倍的大小来存
rst::rasterizer::rasterizer(int w, int h) : width(w), height(h)
{
    frame_buf.resize(w * h);
    frame_sample.resize(w * h * 4);
    depth_buf.resize(w * h * 4);
}
// 记得一起初始化
void rst::rasterizer::clear(rst::Buffers buff)
{
    if ((buff & rst::Buffers::Color) == rst::Buffers::Color)
    {
        std::fill(frame_buf.begin(), frame_buf.end(), Eigen::Vector3f{0, 0, 0});
        std::fill(frame_sample.begin(), frame_sample.end(), Eigen::Vector3f{0, 0, 0});
    }
    if ((buff & rst::Buffers::Depth) == rst::Buffers::Depth)
    {
        std::fill(depth_buf.begin(), depth_buf.end(), std::numeric_limits<float>::infinity());
    }
}
//Screen space rasterization
void rst::rasterizer::rasterize_triangle(const Triangle& t) {
    auto v = t.toVector4();

    // TODO : Find out the bounding box of current triangle.
    // iterate through the pixel and find if the current pixel is inside the triangle
    int x_min = std::min(std::min(v[0].x(), v[1].x()), v[2].x());
    int x_max = ceil(std::max(std::max(v[0].x(), v[1].x()), v[2].x()));
    int y_min = std::min(std::min(v[0].y(), v[1].y()), v[2].y());
    int y_max = ceil(std::max(std::max(v[0].y(), v[1].y()), v[2].y()));
    // 子像素相对坐标
    float dx[4] = {0.25, 0.25, 0.75, 0.75};
    float dy[4] = {0.25, 0.75, 0.25, 0.75};
    for(int x=x_min; x<x_max; x++)
        for(int y=y_min; y<y_max; y++)
        {
            int cnt = 0;
            int ind = get_index(x, y);
            for(int i=0; i<4; i++)
                if(insideTriangle(x + dx[i], y + dy[i], t.v)) {
                    cnt++;
                    // If so, use the following code to get the interpolated z value.
                    auto[alpha, beta, gamma] = computeBarycentric2D(x, y, t.v);
                    float w_reciprocal = 1.0/(alpha / v[0].w() + beta / v[1].w() + gamma / v[2].w());
                    float z_interpolated = alpha * v[0].z() / v[0].w() + beta * v[1].z() / v[1].w() + gamma * v[2].z() / v[2].w();
                    z_interpolated *= w_reciprocal;
                    if(z_interpolated < depth_buf[ind + i])
                    {
                        // 每个子像素深度和颜色独立处理
                        // TODO : set the current pixel (use the set_pixel function) to the color of the triangle (use getColor function) if it should be painted.
                        depth_buf[ind + i] = z_interpolated;
                        frame_sample[ind + i] = t.getColor();
                    }
                }
            if(cnt) {
                // 平均四个子像素的颜色
                set_pixel(Eigen::Vector3f(x, y, 1), std::accumulate(frame_sample.begin() + ind, frame_sample.begin() + ind + 4, Eigen::Vector3f(0, 0, 0)) / 4);
            }


        }
}
可以看到效果还是很明显的,虽然还是有锯齿但明显柔和了很多,毕竟这是放大了十倍看的

未完待续...


 OωO
OωO