

games101 作业笔记(作业4~5)
作业4
这次作业相比前几次简单许多了
首先是 bezier 函数,作业文档讲的很清楚,只需要参考 naive_bezier 的循环,把用公式计算点改成调用 recursive_bezier 来计算绘制点即可,唯一需要注意的是 opencv 默认颜色通道是 BGR 不是传统的 RGB,不过绿色都是在中间,不知道也问题不大
bezier:该函数实现绘制 Bézier 曲线的功能。它使用一个控制点序列和一个 OpenCV::Mat 对象作为输入,没有返回值。它会使 t 在 0 到 1 的范围内进 行迭代,并在每次迭代中使 t 增加一个微小值。对于每个需要计算的 t,将 调用另一个函数 recursive_bezier,然后该函数将返回在 Bézier 曲线上 t 处的点。最后,将返回的点绘制在 OpenCV::Mat 对象上。
void bezier(const std::vector<cv::Point2f> &control_points, cv::Mat &window)
{
    // TODO: Iterate through all t = 0 to t = 1 with small steps, and call de Casteljau's
    // recursive Bezier algorithm.
    for(double t = 0.0; t <= 1.0; t += 0.001)
    {
        auto point = recursive_bezier(control_points, t);
        window.at<cv::Vec3b>(point.y, point.x)[1] = 255;
    }
}
recursive_bezier 函数只需要学习过递归应该都能理解,递归的终止条件就是控制点序列只剩下一个点,返回这个点即可,其他情况下就是计算出新的控制点序列,返回递归调用的结果即可,新点的计算方式类似于之前的插值,通过两个顶点线性插值即可计算出新的点
cv::Point2f recursive_bezier(const std::vector<cv::Point2f> &control_points, float t)
{
    // TODO: Implement de Casteljau's algorithm
    if(control_points.size()==1) return control_points[0];
    std::vector<cv::Point2f> new_control_points;
    for(int i = 1; i<control_points.size(); i++)
        new_control_points.emplace_back(
            (1-t)*control_points[i-1] + t*control_points[i]
        );
    return recursive_bezier(new_control_points, t);

}
提高部分我一开始想到的是双线性插值,但双线性插值的前提是相邻四个像素得有颜色,我们一开始的所有像素都是纯黑的,没法进行双线性插值。但双线性插值的思路还是可以参考的,双线性插值本质上其实就是在以计算点与周围像素中心点的距离作为权重,加权计算出当前像素的颜色。我们可以同样的以计算点于周围像素中心点的距离作为权重,来为周围这四个像素分配颜色。
可以很显而易见的是如果计算点离某个像素点的中心越近,这个像素点就该越绿。另外如果有多个计算点都落在同一个像素点附近,那么这个像素点同样应该越绿。临近四个像素的中心点围成是一个 1*1 的小正方形,因此最远距离就是对角线 sqrt(2)
因此某个像素点的颜色应该是 255 * ( 1 - 像素中心点与计算点的距离与 sqrt(2) 的比值),且每次计算的颜色都是叠加的,当然最大不超过 255
void bezier(const std::vector<cv::Point2f> &control_points, cv::Mat &window)
{
    // TODO: Iterate through all t = 0 to t = 1 with small steps, and call de Casteljau's
    // recursive Bezier algorithm.
    float sqrt2 = std::sqrt(2);
    for(double t = 0.0; t <= 1.0; t += 0.001)
    {
        auto point = recursive_bezier(control_points, t);
        float x_min = std::floor(point.x);
        float x_max = std::ceil(point.x);
        float y_min = std::floor(point.y);
        float y_max = std::ceil(point.y);

        float dx2_min = std::pow(point.x - x_min, 2);
        float dx2_max = std::pow(point.x - x_max, 2);
        float dy2_min = std::pow(point.y - y_min, 2);
        float dy2_max = std::pow(point.y - y_max, 2);
        window.at<cv::Vec3b>(y_min, x_min)[1] = std::min(255.f, window.at<cv::Vec3b>(y_min, x_min)[1] + 255.f * (1- std::sqrt(dx2_min + dy2_min)/sqrt2));
        window.at<cv::Vec3b>(y_max, x_min)[1] = std::min(255.f, window.at<cv::Vec3b>(y_max, x_min)[1] + 255.f * (1- std::sqrt(dx2_min + dy2_max)/sqrt2));
        window.at<cv::Vec3b>(y_min, x_max)[1] = std::min(255.f, window.at<cv::Vec3b>(y_min, x_max)[1] + 255.f * (1- std::sqrt(dx2_max + dy2_min)/sqrt2));
        window.at<cv::Vec3b>(y_max, x_max)[1] = std::min(255.f, window.at<cv::Vec3b>(y_max, x_max)[1] + 255.f * (1- std::sqrt(dx2_max + dy2_max)/sqrt2));
        // window.at<cv::Vec3b>(point.y, point.x)[1] = 255;
    }
}

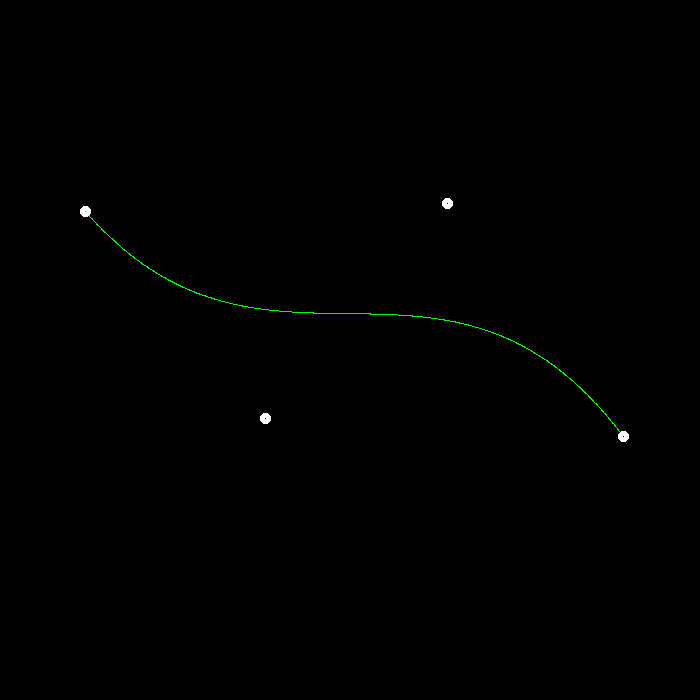
可以很明显的看到上面一张的起始和结束部分要连续很多
作业5
一开始感觉挺难,不知道从哪算,但理清以后会发现这次作业还是挺简单的
首先生成光线其实就是让我确定光线方向,光线起始点肯定是原点摄像机了,根据已经给的方向向量可以知道,屏幕的 z 坐标是 -1,然后我们只要根据当前像素坐标计算出其在屏幕上对应点的坐标是多少。这里需要注意的是,像素坐标是左上角是 (0, 0) 而屏幕空间里的坐标是左下角是(0, 0)(当然屏幕的原点其实应该在中心位置)。
学投影变换的时候我们就学过如何根据 fov 和 AspectRatio 计算出 t 和 r,这里因为 zNear 是 -1,所以 scale 就是原来的 t ,scale * imageAspectRatio 就是 r,这样屏幕的一半宽高就知道了
然后我们只需要将像素的坐标平移到原点,即减去一半的图片宽度或高度,然后缩放成屏幕的宽高即可,只不过 y 的坐标需要镜像一下,另外像素中心的应该是像素偏移 0.5。最后要记得归一化方向向量
void Renderer::Render(const Scene& scene)
{
    std::vector<Vector3f> framebuffer(scene.width * scene.height);

    float scale = std::tan(deg2rad(scene.fov * 0.5f));
    float imageAspectRatio = scene.width / (float)scene.height;

    // Use this variable as the eye position to start your rays.
    Vector3f eye_pos(0);
    int m = 0;
    for (int j = 0; j < scene.height; ++j)
    {
        for (int i = 0; i < scene.width; ++i)
        {
            // generate primary ray direction
            float x;
            float y;
            // TODO: Find the x and y positions of the current pixel to get the direction
            // vector that passes through it.
            // Also, don't forget to multiply both of them with the variable *scale*, and
            // x (horizontal) variable with the *imageAspectRatio*
            x = (i + 0.5 - scene.width / 2.f) * scale * imageAspectRatio / scene.width * 2.f;
            y = (scene.height / 2.f - (j + 0.5)) * scale / scene.height *2.f;
            Vector3f dir = normalize(Vector3f(x, y, -1)); // Don't forget to normalize this direction!
            framebuffer[m++] = castRay(eye_pos, dir, scene, 0);
        }
        UpdateProgress(j / (float)scene.height);
    }

    // save framebuffer to file
    FILE* fp = fopen("binary.ppm", "wb");
    (void)fprintf(fp, "P6
%d %d
255
", scene.width, scene.height);
    for (auto i = 0; i < scene.height * scene.width; ++i) {
        static unsigned char color[3];
        color[0] = (char)(255 * clamp(0, 1, framebuffer[i].x));
        color[1] = (char)(255 * clamp(0, 1, framebuffer[i].y));
        color[2] = (char)(255 * clamp(0, 1, framebuffer[i].z));
        fwrite(color, 1, 3, fp);
    }
    fclose(fp);
}
另一边判断是否相交只需要按照课上的公式即可
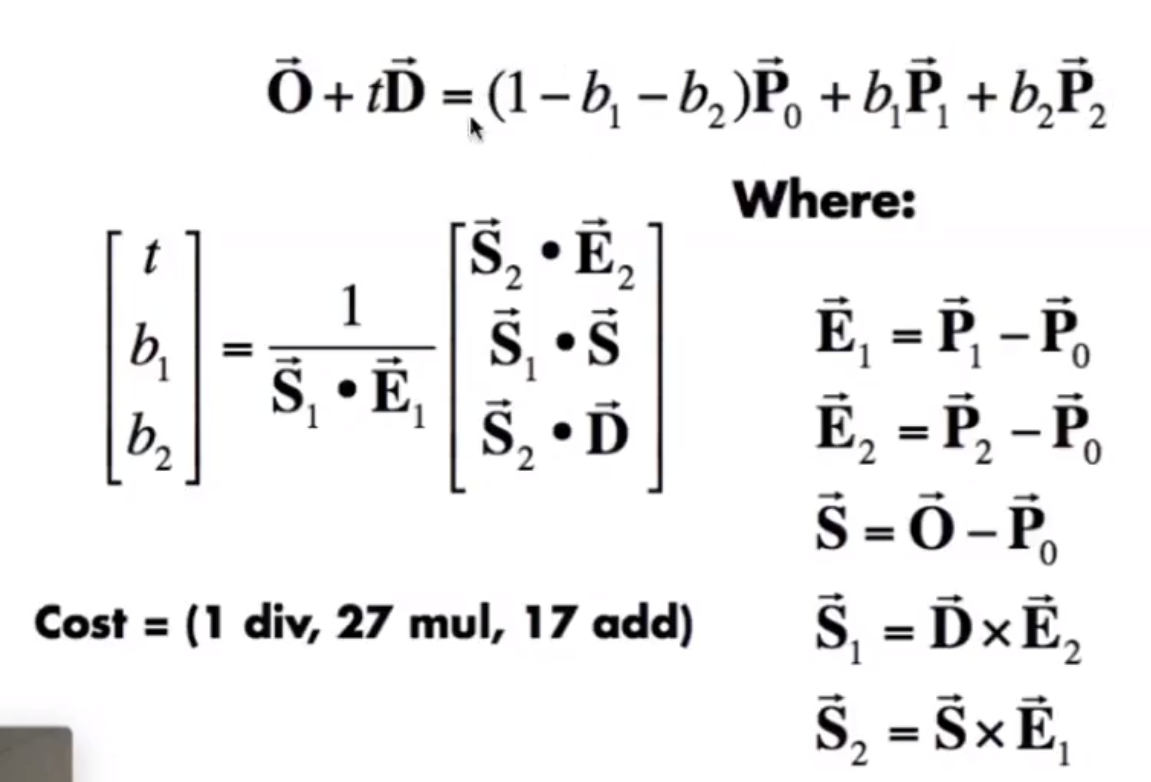
如果碰到渲染出来的地板上有沿着对角线的蓝色像素点的话,可能是 float 精度导致的问题,因为在三角形边上的点,重心坐标是有 0 的,老师也提过很多次,浮点数判断相等是很麻烦的,因此可以给重心坐标加上一个很小的数,比如 Scene.hpp 里就有一个 float epsilon = 0.00001;,这样如果计算出来的结果大于 -0.00001,都会被认为是在三角形里(包括边)。这个问题不一定所有人都有,因为像素计算坐标那里,乘除的先后顺序都会影响最后浮点数的值
bool rayTriangleIntersect(const Vector3f& v0, const Vector3f& v1, const Vector3f& v2, const Vector3f& orig,
                          const Vector3f& dir, float& tnear, float& u, float& v)
{
    // TODO: Implement this function that tests whether the triangle
    // that's specified bt v0, v1 and v2 intersects with the ray (whose
    // origin is *orig* and direction is *dir*)
    // Also don't forget to update tnear, u and v.
    auto e1 = v1 - v0;
    auto e2 = v2 - v0;
    auto s = orig - v0;
    auto s1 = crossProduct(dir, e2);
    auto s2 = crossProduct(s, e1);
    auto se = 1.f/(dotProduct(s1, e1));
    tnear = se * dotProduct(s2, e2);
    u = se * dotProduct(s1, s);
    v = se * dotProduct(s2, dir);
    if(tnear + EPSILON > 0 && u + EPSILON > 0 && v + EPSILON > 0 && 1-u-v + EPSILON > 0) return true;
    return false;
}


 OωO
OωO