

games101 作业笔记(作业 7)
作业7
这次作业有点难,虽然有伪代码,但是一些变量和形参很容易混,wi、wo几乎是混在一起用,而且还有个方向的问题
首先是迁移上次的部分代码,基本就原样复制过来就行了,唯一一个需要注意的就是 Bounds3::IntersectP,这里要考虑 tEnter == tExit 的情况,因为这次的模型里墙壁和天花板地板这些都是没有厚度的,所以相等的情况必须被算作相交,不然就可能出现右边全黑的情况
inline bool Bounds3::IntersectP(const Ray& ray, const Vector3f& invDir,
                                const std::array<int, 3>& dirIsNeg) const
{
    // invDir: ray direction(x,y,z), invDir=(1.0/x,1.0/y,1.0/z), use this because Multiply is faster that Division
    // dirIsNeg: ray direction(x,y,z), dirIsNeg=[int(x>0),int(y>0),int(z>0)], use this to simplify your logic
    // TODO test if ray bound intersects
    double tEnter = std::numeric_limits<double>::lowest();
    double tExit = std::numeric_limits<double>::max();
    for(int i=0; i<3; i++) {
        double tMin = (pMin[i] - ray.origin[i]) * invDir[i];
        double tMax = (pMax[i] - ray.origin[i]) * invDir[i];
        if(!dirIsNeg[i])  std::swap(tMin, tMax);
        tEnter = std::max(tEnter, tMin);
        tExit = std::min(tExit, tMax);
    }
    return tEnter <= tExit && tExit >= 0;
}
其实理论上浮点数的相等应该是相差小于一个较小的数,不过这里因为 tEnter 和 tExit 不是计算出来的,而是 tMin 和 tMax 中的最大最小值,所以两个相等的时候是完全相等的,不会有浮点数计算后导致的误差,所以这里直接把等号加上就好了,不需要相减小于 Epsilon
然后剩下的我们只需要改一个 castRay 函数就行了,这里传进来的 depth 似乎没什么用处,上次作业框架里是限制最深递归深度也就是限制光线反射次数用的,这次作业我们是采用俄罗斯轮盘赌的,不需要这个,而且这次 maxDepth 还被改成了1,直接用的话就只会反射一次了
首先肯定是要获取光线的交点在哪个物体上,如果没碰到物体就返回空就行了
// 获取光线交点
Intersection intersection = intersect(ray);
// 没有碰到物体的情况
if(!intersection.happened)
    return Vector3f();
然后要处理射到光源的情况,如果没有这步的话光源就是黑的了,因为光源是不反射的
// 射到光源的情况
if(intersection.m->hasEmission())
    return intersection.m->getEmission();
剩下的就是按照伪代码一步步来了
想要和光源之间是否有物体遮挡,只需要沿着光源这个方向发出光线,然后看交点是不是 sampleLight 出来的的那个光源的交点就行了,因为考虑浮点数计算的误差,所以我们应该相减后绝对值小于 EPSILON 才算相等,因为光源是一定能射到的,所以不可能射到光源后的物体,所以这里可以去掉绝对值,如果后面渲染出来的结果有一些横向的黑线的话,可能是因为精度的问题,框架原本的 EPSILON 是 0.00001,但实际上精度是低于这个的,我们只要改成 0.0001,就没有黑线了
// 射到物体的情况
Vector3f L_dir, L_indir;

    // 先对光源采样
Intersection inter_light;
float pdf_light = 0.f;
sampleLight(inter_light, pdf_light);
Vector3f obj2light = inter_light.coords - intersection.coords;
Vector3f ws = obj2light.normalized();
float dis = obj2light.norm();

// 如果射到的物体比光源距离近就说明被挡住了
if(intersect(Ray(intersection.coords, ws)).distance - dis >= -EPSILON )
    L_dir = inter_light.emit * intersection.m->eval(ray.direction, ws, intersection.normal) * dotProduct(ws, intersection.normal) * dotProduct(-ws, inter_light.normal) / (dis*dis) / pdf_light;
代码框架里的 wo 是和课上方向相反的,课上是从点 p 向外射的,而代码里是向里射的,因此就是 ray.direction ,然后这里的 eval 函数就是公式里的 fr(p, wi, wo)也就是 BRDF, 但是呢我们其他的 wi, 和 wo 是指从光源或其他物体射到当前物体后反射到摄像机这么条路,所以 wo 是从摄像机(或者上一个物体)指向当前物体的(wo 和课上方向相反),而 wi 是物体指向光源(或者下一个物体),但这个 eval 里用的是其实是 Blinn-Phong 的漫反射模型,它形参里的 wo 是我们之前的 l,这就是物体射向光源的方向,wi 是 v,属于是刚好和外面的 wi 和 wo 定义反了方向,这也是为什么伪代码是 eval(wo, wi, N) 和实际形参是 eval(const Vector3f &wi, const Vector3f &wo, const Vector3f &N)
最后需要注意的就是所有的 BRDF 应该都是当前物体上的这个 p 点的 BRDF,也就是所有的 eval 函数应该都是用我们当前物体的,我这边代码里就是 intersection.m->eval,不管是对光源积分还是对半球积分,还是反射其他物体的情况都是同一个 eval
搞清楚上面的关系后,后面的代码就没什么难点了,基本就是照着伪代码来了,完整代码如下
// Implementation of Path Tracing
Vector3f Scene::castRay(const Ray &ray, int depth) const
{
    // TO DO Implement Path Tracing Algorithm here
    // 获取光线交点
    Intersection intersection = intersect(ray);
    // 没有碰到物体的情况
    if(!intersection.happened)
        return Vector3f();

    // 射到光源的情况
    if(intersection.m->hasEmission())
        return intersection.m->getEmission();

    // 射到物体的情况
    Vector3f L_dir, L_indir;

    // 先对光源采样
    Intersection inter_light;
    float pdf_light = 0.f;
    sampleLight(inter_light, pdf_light);
    Vector3f obj2light = inter_light.coords - intersection.coords;
    Vector3f ws = obj2light.normalized();
    float dis = obj2light.norm();

    // 如果射到的物体比光源距离近就说明被挡住了
    if(intersect(Ray(intersection.coords, ws)).distance - dis >= -EPSILON )
        L_dir = inter_light.emit * intersection.m->eval(ray.direction, ws, intersection.normal) * dotProduct(ws, intersection.normal) * dotProduct(-ws, inter_light.normal) / (dis*dis) / pdf_light;

    // 俄罗斯轮盘赌
    // Manually specify a probability P_RR
    // Randomly select ksi in a uniform dist. in [0, 1]
    // If (ksi > P_RR) return 0.0;
    if(get_random_float() > RussianRoulette)
        return L_dir;

    Vector3f wi = intersection.m->sample(ray.direction, intersection.normal).normalized();

    Ray nextObjRay(intersection.coords, wi);
    Intersection nextInter = intersect(nextObjRay);
    if(nextInter.happened && !nextInter.m->hasEmission())
        L_indir = castRay(nextObjRay, depth+1) * intersection.m->eval(ray.direction, wi, intersection.normal) * dotProduct(wi, intersection.normal) / intersection.m->pdf(ray.direction, wi, intersection.normal) / RussianRoulette;

    return L_dir + L_indir;
}
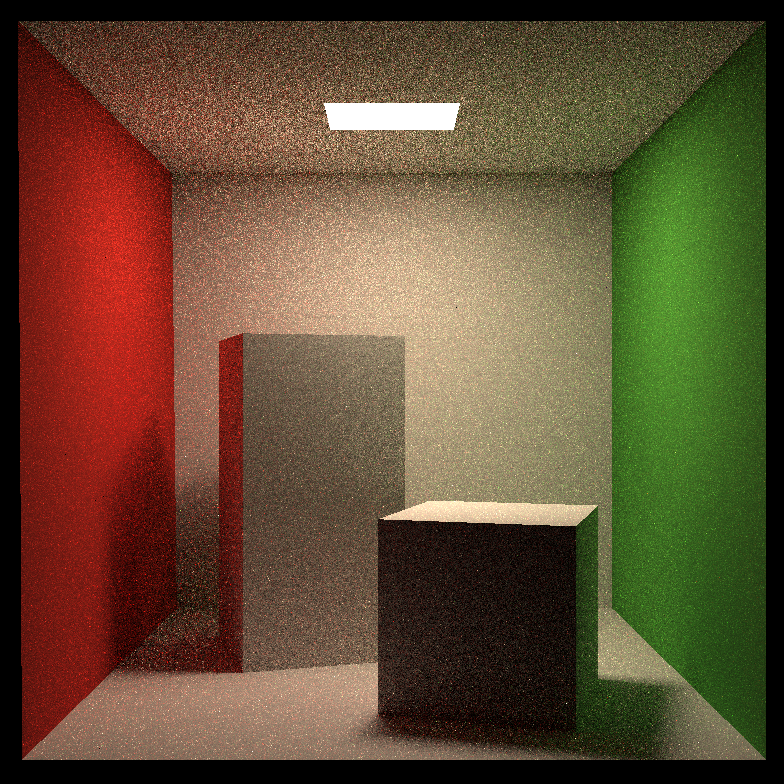
效果如下
多线程
多线程教程可以看这篇 C++11 多线程(std::thread)详解
整体思路很简单,在 render 中是行优先的方式逐行逐列计算的,所以我们可以把屏幕横着切成若干块的,每块一个线程的计算,因为每个像素点的计算其实都是独立不冲突的。考虑到 height 是 960,我们的线程数应该能被 960 整除,我电脑 CPU 是 8 核 12 线程的,所以理论上最多 12 线程并行计算,超出 12 个就是并发切换着来了,所以我就设置了线程数为 12,网上很多教程设置成了 32,但我实际试了下,超出 CPU 最大线程数许多的情况下,32 线程和 12 线程运行时间基本差不多,都是 5 分钟左右,因此并不是线程数越多越快,超出硬件能力后就没多少提升了。
inline float deg2rad(const float& deg) { return deg * M_PI / 180.0; }

const float EPSILON = 0.0001;

std::mutex mutex;
int process = 0;
// The main render function. This where we iterate over all pixels in the image,
// generate primary rays and cast these rays into the scene. The content of the
// framebuffer is saved to a file.
void Renderer::Render(const Scene& scene)
{
    std::vector<Vector3f> framebuffer(scene.width * scene.height);

    float scale = tan(deg2rad(scene.fov * 0.5));
    float imageAspectRatio = scene.width / (float)scene.height;
    Vector3f eye_pos(278, 273, -800);

    // change the spp value to change sample ammount
    int spp = 16;
    std::cout << "SPP: " << spp << "
";

    constexpr int num_threads = 12;
    std::thread threads[num_threads];
    int thread_height = scene.height / num_threads;


    auto renderRow = [&](uint32_t start_height, uint32_t end_height) {
        int m = start_height * scene.width;
        for (uint32_t j = start_height; j < end_height; ++j) {
            for (uint32_t i = 0; i < scene.width; ++i) {
                // generate primary ray direction
                float x = (2 * (i + 0.5) / (float)scene.width - 1) *
                        imageAspectRatio * scale;
                float y = (1 - 2 * (j + 0.5) / (float)scene.height) * scale;

                Vector3f dir = normalize(Vector3f(-x, y, 1));
                for (int k = 0; k < spp; k++){
                    framebuffer[m] += scene.castRay(Ray(eye_pos, dir), 0) / spp;
                }
                m++;
            }
            // 记得上锁
            mutex.lock();
            UpdateProgress(++process / (float)scene.height);
            mutex.unlock();
        }
    };

    for(uint32_t i = 0; i < num_threads; ++i)
        threads[i] = std::thread(renderRow, i * thread_height, (i+1) * thread_height);

    for(uint32_t i = 0; i < num_threads; ++i) threads[i].join();

    UpdateProgress(1.f);

    // save framebuffer to file
    FILE* fp = fopen("binary.ppm", "wb");
    (void)fprintf(fp, "P6
%d %d
255
", scene.width, scene.height);
    for (auto i = 0; i < scene.height * scene.width; ++i) {
        static unsigned char color[3];
        color[0] = (unsigned char)(255 * std::pow(clamp(0, 1, framebuffer[i].x), 0.6f));
        color[1] = (unsigned char)(255 * std::pow(clamp(0, 1, framebuffer[i].y), 0.6f));
        color[2] = (unsigned char)(255 * std::pow(clamp(0, 1, framebuffer[i].z), 0.6f));
        fwrite(color, 1, 3, fp);
    }
    fclose(fp);
}
基本就是把中间双重循环的部分修改一下即可,唯一需要注意的就是进度条的更新需要上锁,以及原本的 m 应该从当前这块的第一个开始+
渲染时间从原本的近40分钟缩短到了5分钟,可以说快了许多
如果编译出现 undefined reference to 'pthread_create' 之类的报错,是因为没有链接 pthread 动态库,需要修改 CMakeLists.txt
cmake_minimum_required(VERSION 3.10)
project(RayTracing)

set(CMAKE_CXX_STANDARD 17)
find_package(Threads)
add_executable(RayTracing main.cpp Object.hpp Vector.cpp Vector.hpp Sphere.hpp global.hpp Triangle.hpp Scene.cpp
        Scene.hpp Light.hpp AreaLight.hpp BVH.cpp BVH.hpp Bounds3.hpp Ray.hpp Material.hpp Intersection.hpp
        Renderer.cpp Renderer.hpp)
target_link_libraries(RayTracing ${CMAKE_THREAD_LIBS_INIT})
Microfacet
这才是目前为止作业里最难的部分,不过主要是理解难,毕竟有许多课上没讲过的公式,但如果不考虑公式的原理直接用的话,倒是还容易一点,首先课上的公式
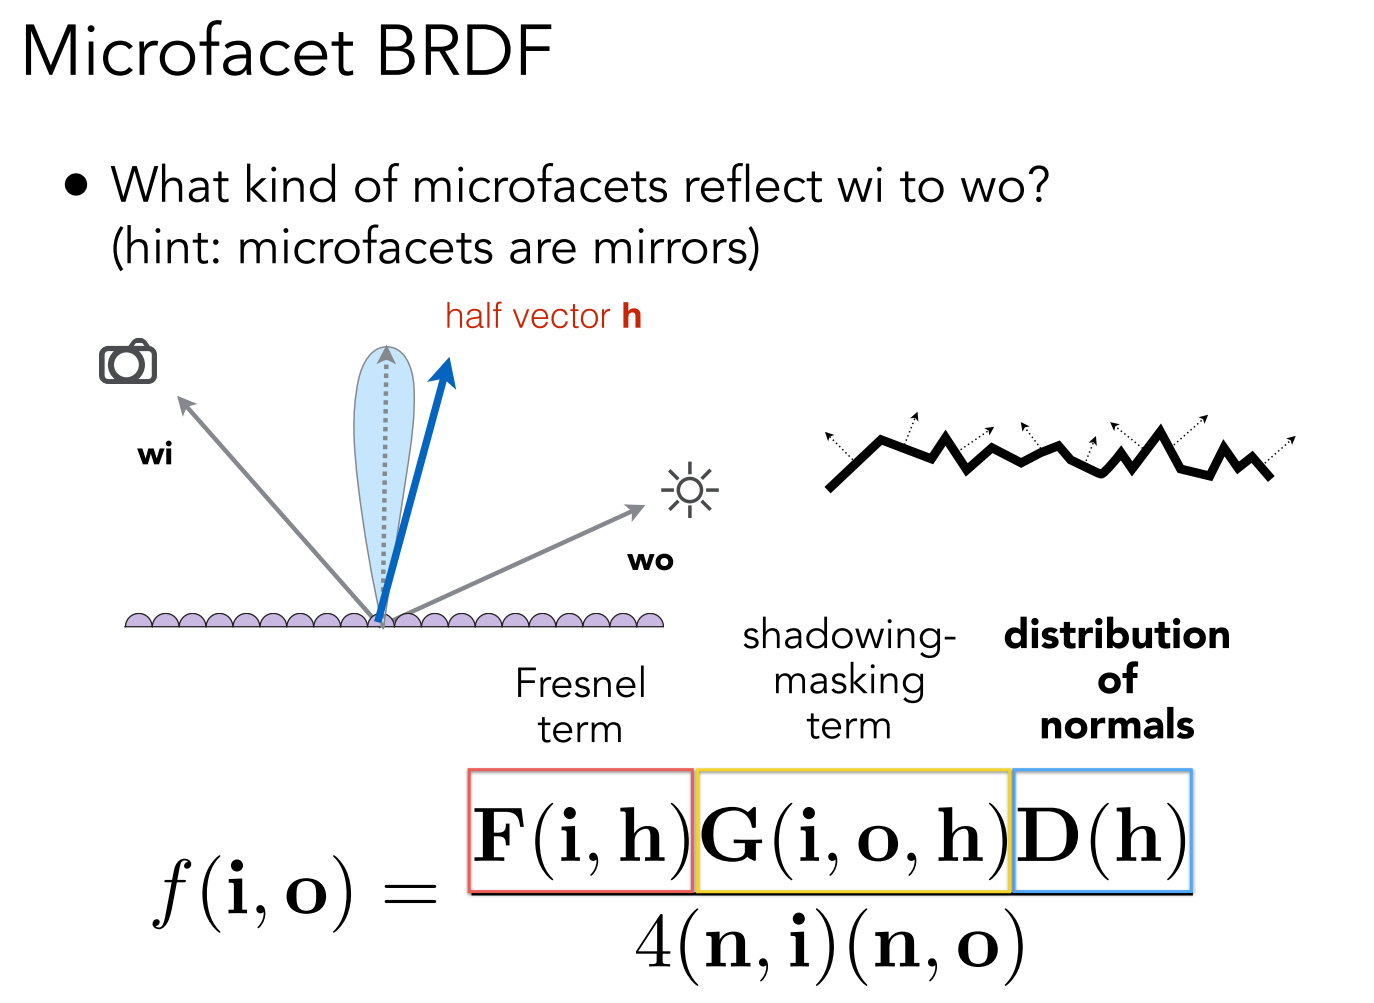
课上没详细讲这个公式,其中除了菲涅尔项以外其他的实现方式更是完全没提,所以这部分内容需要我们自行查找相关资料了,推荐看 LearnOpenGL - Theory
菲涅尔项其实原本框架里有,用的不是这种近似的方式,但我实际用下来发现效果并不如用这种近似的方式,框架提供的菲涅尔方程返回值是一维的 float,这样算出来的高光项就是个一维的,感觉并不符合实际。这里的 F0 是线性插值出来的,后面会提到。
inline Vector3f fresnelSchlick(float cosTheta, const Vector3f &F0)
{
    return F0 + (Vector3f(1.0) - F0) * pow(1.0 - cosTheta, 5.0);
}
然后就是几何项,或者课上的说法叫阴影遮挡函数,处理微表面自遮挡的情况
inline float GeometrySchlickGGX(float NdotV, float k)
{
    float nom   = NdotV;
    float denom = NdotV * (1.0 - k) + k;

    return nom / denom;
}

inline float GeometrySmith(float NdotV, float NdotL, float k)
{
    float ggx1 = GeometrySchlickGGX(NdotV, k);
    float ggx2 = GeometrySchlickGGX(NdotL, k);

    return ggx1 * ggx2;
}
以及重要的法线分布函数,这个函数似乎是种类最多的,不过业界一般都采用 GGX
inline float DistributionGGX(const Vector3f &N, const Vector3f &H, float a)
{
    float a2     = a*a;
    float NdotH  = std::max(dotProduct(N, H), 0.f);
    float NdotH2 = NdotH*NdotH;

    float nom    = a2;
    float denom  = (NdotH2 * (a2 - 1.0) + 1.0);
    denom        = M_PI * denom * denom;

    return nom / denom;
}
最后就是我们的 eval 计算 BRDF
Vector3f Material::eval(const Vector3f &wi, const Vector3f &wo, const Vector3f &N){
    switch(m_type){
        case DIFFUSE:
        {
            // calculate the contribution of diffuse   model
            float cosalpha = dotProduct(N, wo);
            if (cosalpha > 0.0f) {
                Vector3f diffuse = Kd / M_PI;
                return diffuse;
            }
            else
                return Vector3f(0.0f);
            break;
        }
        case MICROFACET:
        {
            // cosθ是入射光和法线的夹角,也就是光源方向和法线方向的夹角
            float cosTheta = dotProduct(N, wo);
            if(cosTheta > 0.f) {
                Vector3f F0(0.04f);
                Vector3f V = -wi;
                Vector3f L = wo;
                Vector3f H = (V + L).normalized();
                float NdotV = std::max(dotProduct(N, V), 0.f);
                float NdotL = cosTheta;
                // 直接光照情况下的 k 公式
                float k = (roughness + 1.f) * (roughness + 1.f) / 8.f;
                float D = DistributionGGX(N, H, roughness);
                float G = GeometrySmith(NdotV, NdotL, k);
                F0 = lerp(F0, Kd, metalness);
                Vector3f F = fresnelSchlick(dotProduct(H, V), F0);
                // float F;
                // fresnel(V, N, ior, F);
                Vector3f fs = D * G * F / (4.f * NdotV  * NdotL);

                // 菲涅尔项就是 ks, kd = 1-ks;
                Vector3f fr = (Vector3f(1.f) - F) * Kd / M_PI;

                return fr + fs;
            }
            return Vector3f(0.f);
        }
    }
}
其他没啥好说的,有一点需要注意的是框架里定义的 Kd 其实是课上提到的 albedo,也就是物体原本的颜色,我们的 F0 基准是 0.04,通过金属性 metalness 我们就可以插值出不同的 F0
但是我发现如果 sample 和 pdf 不做修改的话,渲染结果还是接近于漫反射的效果,镜面的效果并不明显,因此我翻阅很多资料,有位同学整理了很详细的作业问题集合GAMES101 作业问题整理,强烈建议阅读。
其中很重要的一点是,随机函数真的极大影响性能,建议参考文章中的方法修改,我这边修改后速度快了 20 多倍。另外 cmake 编译的时候设置成 release 也能让渲染速度快个几倍,其他诸如 O3 优化什么的也都可以加上,还有许多人提到的 OpenMP,不过我在执行上面几步之前改成 OpenMP 并没有加快多少速度,一套改完也不知道 OpenMP 是否在这些加速中起到作用,不过 OpenMP 写起来会简洁很多,还是非常建议使用的,而且 OpenMP 可以不使用锁,也能提升一点性能。修改后如下,这里我顺便使用了 MSAA 的方法来实现抗锯齿,只需要把之前对着像素中心点采样 spp 次改成对像素内随机 spp 个点分别进行一次采样就好了,不仅不影响性能还能反走样。(不过光源边上似乎还是有些锯齿)
constexpr int num_threads = 12;
int thread_height = scene.height / num_threads;

#pragma omp parallel for
for(uint32_t t = 0; t < num_threads; ++t) {
    uint32_t start_height = t * thread_height;
    uint32_t end_height = (t+1) * thread_height;
    uint32_t m = start_height * scene.width;
    for (uint32_t j = start_height; j < end_height; ++j) {
        for (uint32_t i = 0; i < scene.width; ++i) {
            for (int k = 0; k < spp; k++){
                // generate primary ray direction
                float x = (2 * (i + get_random_float()) / (float)scene.width - 1) *
                        imageAspectRatio * scale;
                float y = (1 - 2 * (j + get_random_float()) / (float)scene.height) * scale;

                Vector3f dir = normalize(Vector3f(-x, y, 1));

                framebuffer[m] += scene.castRay(Ray(eye_pos, dir), 0) / spp;
            }
            m++;
        }
        #pragma omp critical
        UpdateProgress(++process / (float)scene.height);
    }
}


UpdateProgress(1.f);
最后我渲染 1024 的 spp 也只花了 6 分钟。
然后就是我们的重头戏重要性采样,之前说了,采样如果和原本一样均匀采样,镜面效果会差很多,公式和原理建议看这篇 Microfacet模型采样下的brdf),是对这篇 Sampling Microfacet BRDF 英文文章的翻译和补充,基本只需要照着公式来就可以了,只需要注意我们的 wi 是 ray.direction,是和法线方向反的,需要负一下。
Vector3f Material::sample(const Vector3f &wi, const Vector3f &N){
    switch(m_type){
        case DIFFUSE:
        {
            // uniform sample on the hemisphere
            float x_1 = get_random_float(), x_2 = get_random_float();
            float z = std::fabs(1.0f - 2.0f * x_1);
            float r = std::sqrt(1.0f - z * z), phi = 2 * M_PI * x_2;
            Vector3f localRay(r*std::cos(phi), r*std::sin(phi), z);
            return toWorld(localRay, N);

            break;
        }
        case MICROFACET:
        {
            // 随机一个 ε 和 φ
            float r0 = get_random_float();
            float r1 = get_random_float();
            float a2 = roughness * roughness;
            float phi = 2 * M_PI * r1;
            float theta = std::acos(sqrt((1 - r0) / (r0 * (a2 - 1) + 1)));
            // 单位向量半径就直接 1 了,转换为直角坐标系只需要用到 r*sinθ,所以这里直接乘上去了
            float r = std::sin(theta);
            return reflect(wi, toWorld(Vector3f(r * std::cos(phi), r * std::sin(phi), std::cos(theta)), N));

        }
    }
}

float Material::pdf(const Vector3f &wi, const Vector3f &wo, const Vector3f &N){
    switch(m_type){
        case DIFFUSE:
        {
            // uniform sample probability 1 / (2 * PI)
            if (dotProduct(wo, N) > 0.0f)
                return 0.5f / M_PI;
            else
                return 0.0f;
            break;
        }
        case MICROFACET:
        {
            Vector3f h = (wo - wi).normalized();
            float cosTheta = dotProduct(N, h);
            float a2 = roughness * roughness;
            float exp = (a2 - 1) * cosTheta * cosTheta + 1;
            float D = a2 / (M_PI * exp * exp);
            return D * cosTheta / (4.f * dotProduct(wo, h));
        }
    }
}
因为这里用到了 roughness 为了方便和统一管理,我把 roughness 和 metalness 都放到了 Material 上面。然后记得把 m_type 加上微表面材质
enum MaterialType { DIFFUSE, MICROFACET};
然后把 main 函数中的材质换成微表面材质,并设置好 kd 、roughness 和 metalness 即可,光源因为是单独采样和计算pdf的,且不会反射,材质就不需要管了。
Material* red = new Material(MICROFACET, Vector3f(0.0f));
red->Kd = Vector3f(0.63f, 0.065f, 0.05f);
red->roughness = 0.8f;
red->metalness = 0.3f;

Material* green = new Material(MICROFACET, Vector3f(0.0f));
green->Kd = Vector3f(0.14f, 0.45f, 0.091f);
green->roughness = 0.5f;
green->metalness = 0.5f;

Material* white = new Material(MICROFACET, Vector3f(0.0f));
white->Kd = Vector3f(0.725f, 0.71f, 0.68f);
white->roughness = 0.2f;
white->metalness = 0.2f;

Material* light = new Material(DIFFUSE, (8.0f * Vector3f(0.747f+0.058f, 0.747f+0.258f, 0.747f) + 15.6f * Vector3f(0.740f+0.287f,0.740f+0.160f,0.740f) + 18.4f *Vector3f(0.737f+0.642f,0.737f+0.159f,0.737f)));
light->Kd = Vector3f(0.65f);

Material* micro_Al = new Material(MICROFACET, Vector3f(0.0f));
micro_Al->Kd = Vector3f(0.913f, 0.921f, 0.925f);
micro_Al->roughness = 0.01f;
micro_Al->metalness = 1.f;

Material* micro_Au = new Material(MICROFACET, Vector3f(0.0f));
micro_Au->Kd = Vector3f(1.000f, 0.766f, 0.336f);
micro_Au->roughness = 0.2f;
micro_Au->metalness = 0.8f;

MeshTriangle floor("../models/cornellbox/floor.obj", white);
MeshTriangle shortbox("../models/cornellbox/shortbox.obj", micro_Au);
MeshTriangle tallbox("../models/cornellbox/tallbox.obj", micro_Al);
MeshTriangle left("../models/cornellbox/left.obj", red);
MeshTriangle right("../models/cornellbox/right.obj", green);
MeshTriangle light_("../models/cornellbox/light.obj", light);
最后发现 roughness 较低时会有大量白色噪点,参考论坛这边 作业七Microfacet的噪音问题 的讨论,在castRay 返回的时候限制到 [0,1] 之间能极大改善效果,不过这样肯定会损失一部分能量,我这边没别的好的解决方案。
return Vector3f::Min(Vector3f::Max(L_dir + L_indir, Vector3f(0)), Vector3f(1));
在 spp 较小时一般不太会出现噪点,但 spp 一大还是会出现少量的噪点,下面这是 spp128 的效果,可以看到有明显的模糊感,不过整体效果还是不错的
spp = 1024,通透了许多,但出现了噪点

最后 spp 2048 噪点就更多了,感觉 1024 综合效果最好

后来我又试着限制了一下 pdf,让 pdf 接近 0 的时候,不再计算这部分,事实证明,最后的噪点也没了,虽然有些文章里不推荐这么做,又是一处不符合物理的地方,但除此之外确实没有别的方法去除噪点。
if(nextInter.happened && !nextInter.m->hasEmission()) {
    float pdf = intersection.m->pdf(ray.direction, wi, intersection.normal);
    if(pdf >= EPSILON)
        L_indir = castRay(nextObjRay, depth+1) * intersection.m->eval(ray.direction, wi, intersection.normal) * dotProduct(wi, intersection.normal) / pdf / RussianRoulette;
}
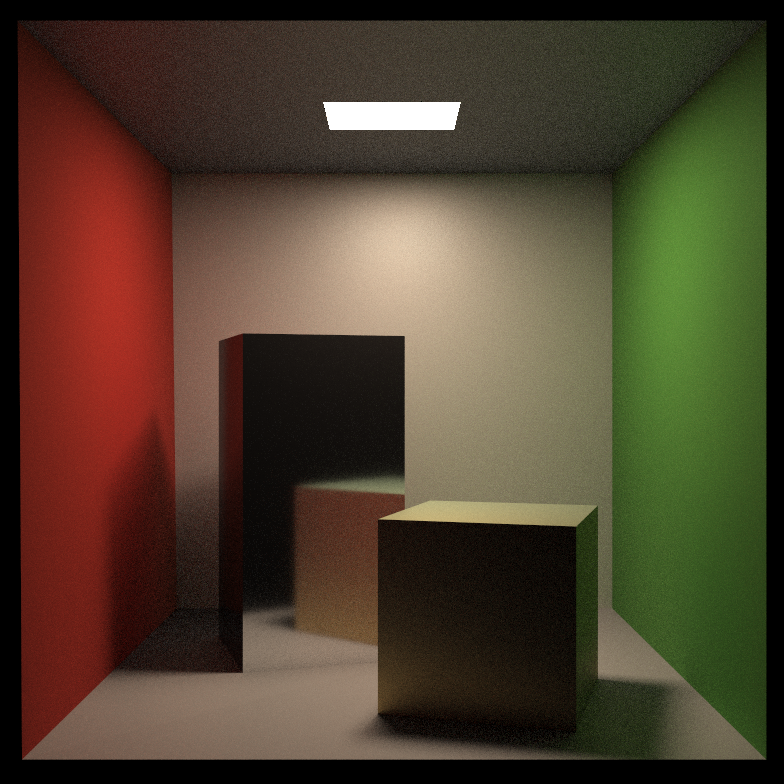
最终效果如下,spp = 2048,图片大小 1024*1024


 OωO
OωO